Facebook Messenger is a free instant messaging service from Facebook that allows users to send text messages, photos, videos, and voice messages.
Once connected, Facebook provides several features to help you engage both existing and potential customers to send messages to your Facebook Messenger.

How Customers Can Send Messages #
Facebook Messenger requires customers to send the first message to your business in order to start a conversation.
There are several ways to encourage customers to initiate a chat:
Chat Link: This is an m.me URL that you can add to your website or newsletters. When customers click the link, they will be redirected to your Facebook Page on Messenger to start a conversation with you.
QR Code: QR codes can be placed in physical locations such as hotels, restaurants, or malls. When customers scan the code, they will be directed to your Facebook Messenger to start chatting with you.
Chat Plugin: This allows customers to send messages directly through a chat widget on your website.
Click to Instagram Direct AdsThese are Instagram ads that can appear across Facebook, Facebook Messenger, and Instagram. When customers click the ad, they will be directed to your Instagram inbox.
Supported File Types #
The following file types are supported by Facebook Messenger, along with their maximum file sizes:
Images (up to 25 MB)
Audio (up to 25 MB)
Video (up to 25 MB)
Message Status Availability #
The table below shows the availability of message statuses in Facebook Messenger:
| Message Status | Availability |
|---|---|
| Sent | ✅ |
| Delivered | ✅ |
| Read | ✅ |
| Failed | ✅ |
Getting a Facebook Business Page #
A Facebook Page serves as a central hub for brands, businesses, and organizations to engage with their customers. To create a Facebook Business Page, please review the following requirements and steps.
- Facebook Profile
A Facebook Page serves as a central hub for brands, businesses, and organizations to engage with their customers. To create a Facebook Business Page, please review the following requirements and steps. - Category
A category defines the type of business you are creating. You can select up to three (3) categories that best represent your business, brand, or organization. Choosing the right category helps customers better understand your page.
To create a Facebook Business Page, follow these steps:
- Open Facebook for Business and click Create Page
- Follow the instructions to set up your Facebook Business Page
Meta Business Verification #
Meta Business Verification is the process of confirming the authenticity of your business with Meta. This verification enables access to exclusive features and increases messaging limits across Meta products.
Connect Your Facebook Page to the Facebook Messenger Channel in Layanika #
Follow the steps below to connect your Facebook Page to the Facebook Messenger channel in Layanika:
Step 1:
Go to the Settingsmenu, then select Channel.
Step 2:
Click add channel, then select facebook messenger.
Step 3:
Click Connect With Facebook then log in to your Facebook account.
Step 4:
Select the Facebook Business portfolio you want to connect to Layanika, then click Continue.
Step 5:
If you do not have a Facebook Page yet, click Create Page.
Step 6:
Fill in the form to create your page. The required information includes:
- Business Page Name
- Business Category
Step 7:
Click Save to confirm access to Layanika.
Channel Configuration #
Facebook Messenger configuration page allows you to edit the channel name and provides a chat link and QR code to help customers start conversations with you.
Step 1:
Go to the Settingsmenu, then select Channel. Find your Facebook Messenger channel, then click Manage
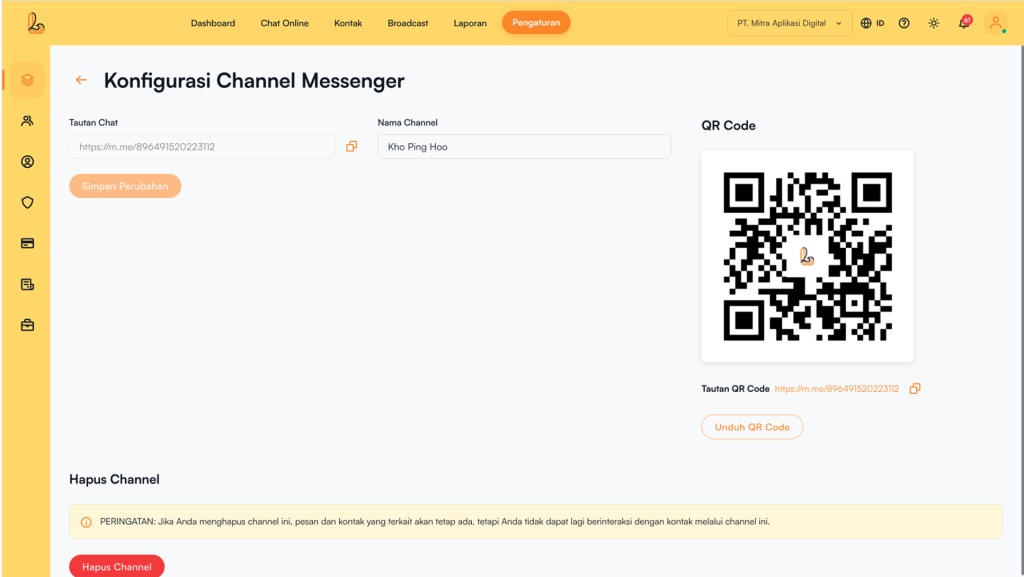
Step 2:
On Facebook Messenger Configuration page page you will see the following:
- Channel Name: The channel name can be edited and is used internally to identify the channel.
- Chat Link: The chat link is a short URL that directs customers to start or continue a conversation with your Facebook account. Customers will be redirected to a new or existing thread depending on whether they have previously messaged your Facebook account.
- Qr Code: You can use the QR code to share the chat link with your contacts by clicking Download QR Code.
Delete Facebook Messenger Channel #
You can remove the Facebook Messenger channel from Layanika. Below is a guide on how to delete the channel:
Step 1:
Go to the Settings > Channel. Then your Facebook Messenger channel, then click Manage
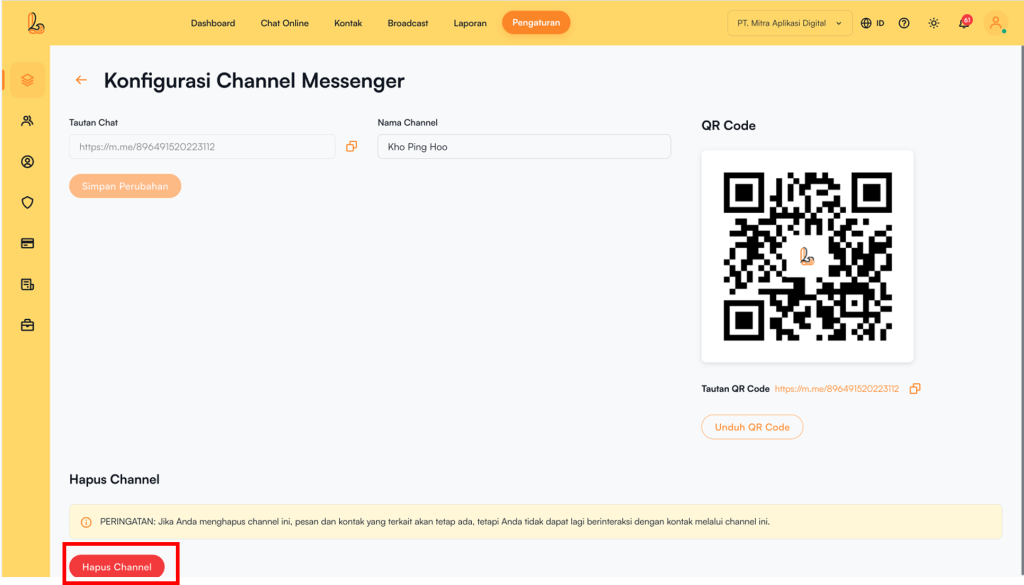
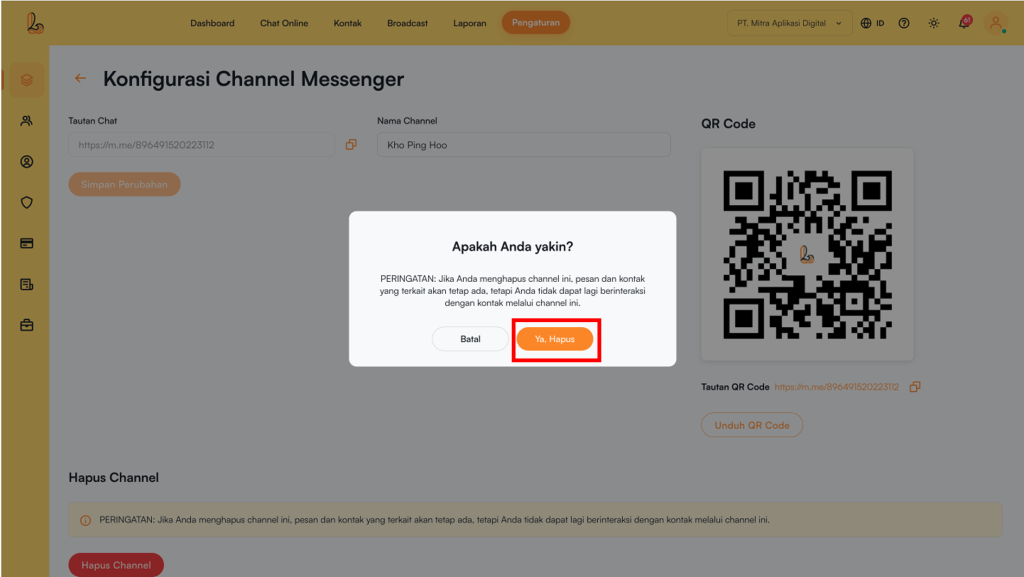
Step 2:
On the Facebook Messenger channel configuration page, click Delete Channel. The system will display a confirmation prompt asking whether you want to remove the Facebook Messenger channel. If you are sure, click Yes, Delete.